前回記事のリモートアクセスVPN (L2TP/IPsec) と、さらにその前の記事で構築済みのVPS-自宅間VPN (IPsec) を組み合わせて利用する。
これにより、動的IPアドレスの自宅へ、外部からいつでもログイン可能となる。
前提:
・サーバはすべて Ubuntu 14.04 LTS である。
・IPsec実装は strongswan を利用し、サーバ間はRSA証明書認証を行う。
・外部端末-VPS間はL2TP/IPsecとし、認証はIPsec事前共有鍵+L2TPのMSCHAPv2とする。
ネットワーク構成は以下の通り。
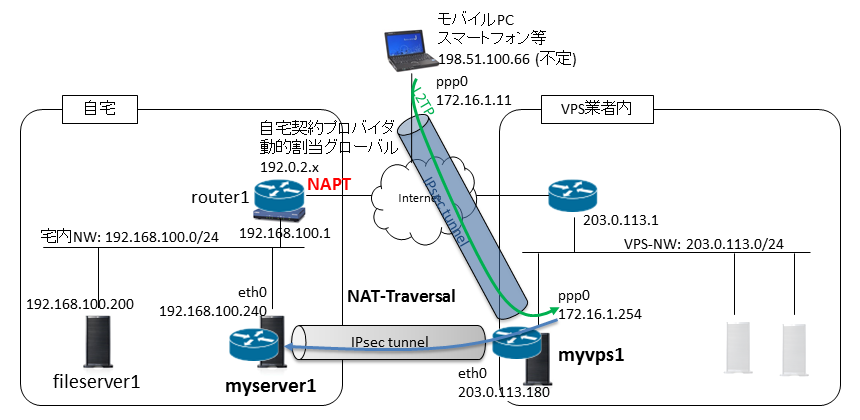
すでに記事としては前回・前々回で記述している。
今回のポイントは、VPS への L2TP アクセスで割り振られる PPP IPアドレスを、VPS-自宅間IPsecのトンネルに入るよう設定することである。
1. myvps1 と myserver1 の /etc/sysctl.conf
$ sudo vi /etc/sysctl.conf
net.ipv4.ip_forward=1  #28行目のコメントを外す
# 以下、追記する
net.ipv4.conf.default.send_redirects=0
net.ipv4.conf.all.send_redirects=0
net.ipv4.conf.eth0.accept_redirects=0
net.ipv4.conf.eth0.send_redirects=0
net.ipv4.conf.lo.accept_redirects=0
net.ipv4.conf.lo.send_redirects=0
net.ipv6.conf.eth0.accept_redirects=0
net.ipv6.conf.lo.accept_redirects=0
vpn1:~$ sudo sysctl -p /etc/sysctl.conf
2. myserver1上にCAを作成し、myserver1用とmyvps1用の証明書・秘密鍵の組を作成する
myserver1 には
/etc/ipsec.d/cacerts/ca1.crt (CA証明書)
/etc/ipsec.d/certs/myserver1.crt (サーバ証明書)
/etc/ipsec.d/private/myserver1.key (サーバ秘密鍵)
myvps1 には
/etc/ipsec.d/cacerts/ca1.crt (CA証明書)
/etc/ipsec.d/certs/myvps1.crt (サーバ証明書)
/etc/ipsec.d/private/myvps1.key (サーバ秘密鍵)
以上のファイルを配置する。
3. strongswan の設定 (myserver1側)
/etc/ipsec.conf:
config setup セクションの後に以下の内容を追加する。rightsubnet に L2TP クライアントの IP アドレス領域を追加しておく。
conn myhome-to-vps
	authby=rsasig
	auto=start
	closeaction=restart
	dpdaction=restart
	left=192.168.100.240
	leftsubnet=192.168.100.0/24
	leftcert=myserver1.crt
	right=203.0.113.180
	rightsubnet=203.0.113.180/32,172.16.1.0/24 # ←L2TPのクライアントアドレスを追加
	rightid="C=JP, ST=Aichi, O=Home, OU=Server, CN=myvps1.vpsnet.example.jp"
※strongswan だと leftsubnet / rightsubnet に複数のサブネットが記述できるが、openswan で複数サブネットの場合は leftsubnets / rightsubnets と書く必要がある。
/etc/ipsec.secrets:
: RSA myserver1.key
4. strongswan の設定 (myvps1側)
/etc/ipsec.conf:
config setup セクションの後に、以下の2つの記述を追加する。
myhome-to-vps の方の leftsubnet には、L2TP クライアントアドレス領域を追加しておく。
conn myhome-to-vps
	authby=rsasig
	auto=add
	closeaction=clear
	dpdaction=clear
	left=203.0.113.180
	leftsubnet=203.0.113.180/32,172.16.1.0/24 # ←L2TPのクライアントアドレスを追加
	leftcert=myvps1.crt
	right=%any
	rightsubnet=192.168.100.0/24
	rightid="C=JP, ST=Aichi, O=Home, OU=Server, CN=myserver1.domain.local"

conn L2TP-PSK
        authby=secret
        auto=add
        closeaction=clear
        dpdaction=clear
        type=transport
        rekey=no
        left=203.0.113.180
        leftprotoport=17/1701
        right=%any
        rightprotoport=17/%any
/etc/ipsec.secrets:
自宅IPsec用のRSA秘密鍵と、L2TP/IPsec用の事前共有鍵文字列を両方記述する。
: RSA myvps1.key
: PSK "mypresharedkey"
5. xl2tpd の設定 (myvps1側)
/etc/xl2tpd/xl2tpd.conf:
[global]
port = 1701

[lns default]
ip range = 172.16.1.11-172.16.1.30
local ip = 172.16.1.254
length bit = yes
require chap = yes
refuse pap = yes
require authentication = yes
name = myvps1.vpsnet.example.jp
ppp debug = no
pppoptfile = /etc/ppp/xl2tpd-options
/etc/ppp/xl2tpd-options:
ipcp-accept-local
ipcp-accept-remote
ms-dns 172.16.1.254  (myvps1にキャッシュDNSサーバが立っている前提)
noccp
auth
crtscts
idle 1800
mtu 1300
mru 1300
nodefaultroute
lock
connect-delay 5000
refuse-pap
refuse-chap
refuse-mschap
require-mschap-v2
/etc/ppp/chap-secrets:
username * "l2tppassworddesu" *
一般ユーザで読めない権限にしておくこと。
6. サービス起動と確認
myserver1:~$ sudo service strongswan restart

myvps1:~$ sudo service strongswan restart

myvps1:~$ sudo service xl2tpd restart